How To Point Your French Stone Property
Advice
DIY Tips from an experienced artisan
ONE of the most important jobs when renovating a traditional stone property is not too difficult to get right, but all too easy to get horribly wrong. Pointing your stone walls is the job that gives the first impression of your property and makes people either sigh with delight or gasp. It’s a fairly major renovation task, but one that is not out of the reach of the competent DIY enthusiast.
The very first step is to empty your mind of any preconceived ideas: forget cement, struck pointing, pointing irons, bag finishes, and just take your cues from what you see around you – the styles and materials of your area, and the methods used by local artisans. When it is carried out correctly a good pointed finish can blend newly created openings with the old, repair cracks and give your property a professional finish. The following advice focuses on pointing a brown stone building of a fairly dense Aveyronnais type of stone, but it works just as well on porous limestone buildings.
Preparation
As with any task, preparation is key. The first thing to do is beg, borrow or steal suitable scaffolding that is fit for the purpose. Then remove any existing pointing or render. This can range from the easily removable lime to obstinate cement. A useful tool is a small hand-held pistol that runs off a compressor. These are available from all DIY centres and are fairly inexpensive. More obstinate cement renders will require a heavy-duty breaker. The joints around the stones should be raked out to a depth of 10-20 mm ready to take the new pointing. Once this is carried out, the loose debris remaining in the joints needs to be blown out with compressed air (a garden leaf blower can work just as well).
At this point you need to decide if sandblasting the stone is necessary: if the building has a thick covering of mold, or has had extensive modifications this may be necessary in order to homogenize the appearance. Personally, I prefer to avoid this if possible because it can give the building an over-renovated appearance and can lose some of the natural character. If you need to sandblast, the apparatus is available to hire from all hire centres.
Materials
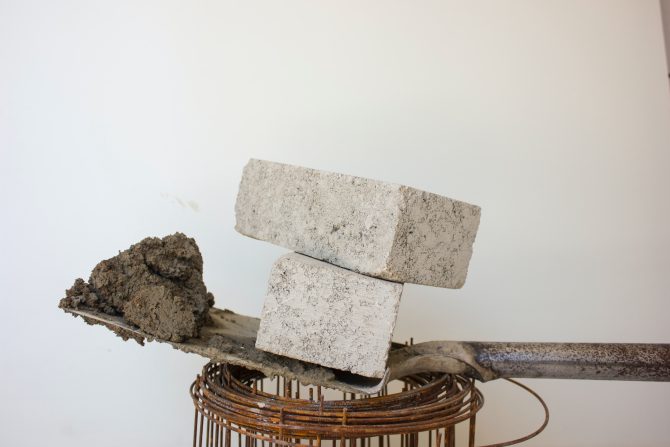
In order to achieve a warm golden finish to the mortar I use ‘sable roux’ which is ginger colour sand, as opposed to the ‘sable de rivière’, which is more grey coloured. It is best mixed with ‘Calcia Rénocal’, a white mix of lime and cement (‘Lafarge Tradifarge’ produces the same finished colour but is less supple to work with). It is important to use lime because this allows the building to breathe as moisture passes through and out of the building. These products have a measure of cement contained within them, which helps them to set, whereas pure natural lime is always active and never fully sets.
I find that a mix of 3.5 shovels of sable roux to 1 of Rénocal gives the best finish. It is important to always keep this formula the same. Put half a bucket of water in a cement mixer and add doses of 3.5 to 1 (the number of gauges you use will vary according to the size of your mixer). You may need to add further water until your mix forms a large sausage shape in your mixer. If it holds no shape it is too wet and if it breaks apart it is too dry. Tip it into a wheelbarrow and move it close to your work site. You are now ready to begin.
Application
In order to help the adherence it is always a good idea to dampen the joints with water, this is easily done with a garden sprayer or pulverisateur. The more porous the stone the more moisture is required: dense Aveyron stone requires very little.
You then need to take a small sausage of mortar from your bucket onto a large trowel and feed it into the joint on the wall using a smaller bull-nosed trowel. Work from the bottom upwards and follow the path of the joints. It is vitally important to fill all joints, as any voids left between stones will show as ugly black shadows on the finished wall. Don’t worry if some goes on the edges of the stones as this will be brushed off later.
The amount that can be done in a day depends on the climate, the nature of the stone and the relative humidity of the wall: as a rule of thumb I would generally not recommend putting any more pointing into a wall after lunch-time, unless you are confident about your drying time, or enjoy working after midnight.
Finish
There is an optimum point when your mortar is ready for brushing-off to give that attractive aged look to the stonework, and will usually be at least two hours after the mortar has been applied to the wall. A standard wire brush is used to brush-off. The mortar is ready when the surface breaks away in a fine dust with very little brushing effort. If brushing pulls the mortar out of the joint it is still too damp, if the brush makes no impact on the mortar without vigorous rubbing you have left it too late and you are in for a long haul but you will end up with arms like a body-builder.
Brush across the joints exposing the stones as you go. Be very careful not to leave any of the mortar surface untouched, as these areas will dry a bright white rather than the soft ochre colour of the rest.
Result
Once you have finished brushing off, stand back, admire your handiwork, pour a large gin and tonic, pat yourself on the back and hope that the fairies come along in the night to clear up the mess and take down the scaffolding.
•With thanks to Trevor Morris
Trevor Morris runs a renovation business, specializing in barn conversions and the general overhaul of homes in the South-West of France.
Share to: Facebook Twitter LinkedIn Email
Related Articles

By David Bolton
Leave a reply
Your email address will not be published. Required fields are marked *
REPLY