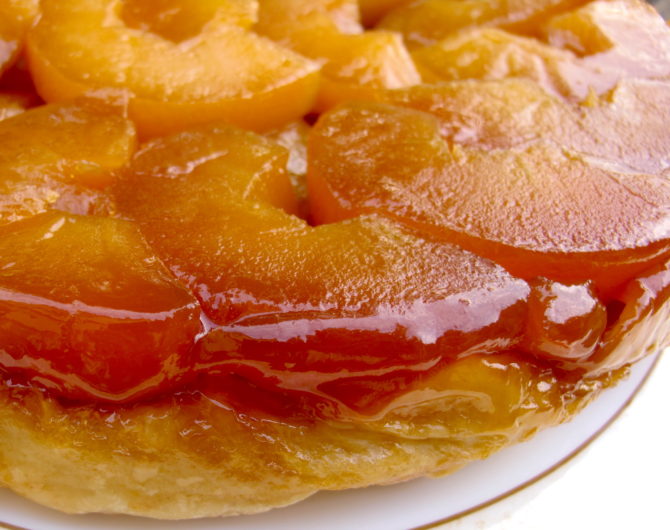
The perfect tarte Tatin recipe
According to my old 1984 edition of Larousse Gastronomique (given as a wedding present as a young Scot about to embark in a French kitchen), the tarte Tatin recipe was first served in Paris at Maxim’s giving a bow to its creators, the famous Tatin sisters.
Stéphanie and Caroline Tatin came up with this irresistible dessert quite by accident at the end of the 19th century while running their hotel-restaurant in the French Sologne region, south of Paris. The story goes (I have two conflicting ones from different cookbooks) that, as the apples were caramelising in sugar and butter in the oven for their tarte Solognote, they either realised they had forgotten the pastry or that they had burned the apples, so they simply plopped the pastry on top, baked then flipped the tart upside down, and… mon Dieu, look what turned up! From then on tarte Tatin was served as their speciality until they retired in 1906, although they never called it a Tarte Tatin.
Newly married, I was totally intimidated by my French mother-in-law’s tarte Tatin. Her dessert looked so sumptuous and grand, with its glistening slices of warm caramelised apples sitting on top of a crispy pastry, just oozing with the sticky juices. How did she do it?
Pressing her short and simple recipe in my hand, I was assured it was easy and inrattable. “You can’t go wrong”, she said. Well, I did get it wrong.
For a start, I used apples that didn’t survive the cooking process (Pink Lady) and when I quickly turned the pan upside down for the grand finale unmoulding moment, some of the apples stuck to the bottom and the rest sat there miserably, in the form of a pale uncaramelised mush. I thought of inventing a new “Apple Sauce Tart” but somehow it didn’t have quite the same happy accident appeal as that of the elderly Tatin Sisters. So, lesson learned: use good quality tart apples such as Granny Smith or French Golden Delicious.
As a result of a few other little tweaks and improvements, you can also now be rest assured that what flips out at the end of this recipe will be a much greater pleasure!
CLASSIC TARTE TATIN RECIPE
Serves 4-6
Preparation Time: 20 minutes
Cooking Time: About 1 hour
Ingredients
2 Tbsp water
120g caster sugar (plus 2 tbsp)
50g unsalted butter (plus 15g extra)
pinch salt (optional)
5-6 apples (Golden Delicious or Granny Smith)
200g puff pastry (ideally ready-rolled and thawed, if frozen)
[mrb]
Preparation
For best results, butter a round 25cm-deep baking tin, or use a good solid-based ovenproof frying pan
1. In a heavy bottomed saucepan, stir the water and sugar together and, over a medium heat, leave to bubble and simmer until a light golden brown caramel forms. Take off the heat, stir in the butter (and salt if using) and immediately pour into the baking tin.
2. Preheat the oven to 190°C/375°F (gas 5). Peel the apples, cut them in half, remove the cores with a sharp knife (or use an apple corer) and cut them again horizontally.
3. Arrange the apples upright in a circle and pack them as tight as you can (they’ll shrink while cooking), filling as much space as possible in the middle. Cut up any leftover apple and stuff them into the spaces. Dot with the extra butter and lightly sprinkle over the 2 tablespoons of sugar. Bake in the oven for 35 minutes.
4. Remove the apples from the oven to cool slightly as you prepare the pastry.
5. Ideally your puff is ready rolled so there’s no need to do anything. (If the puff pastry is in a block, roll it out to about 2mm thickness and cut out a circle very slightly larger (2-3cm) than the size of the pan you’re using). Place the puff pastry circle on top of the apples, tucking in the sides as far down the edges as you can, as it will neatly hold the apples when turned over at the end. Pierce a small hole in the middle of the pastry to allow any steam to escape. This will prevent the puff pastry from puffing up too much while baking.
6. Bake in the oven for a further 25-30 minutes, until the pastry is golden brown and the apple juices leak around the edges.
7. Leave to cool. Run a sharp knife along the edges just to help release it perfectly. To turn out the tart, cover the pan with a large deep plate (to catch the juices) and, using a hand towel, hold the pan and plate together and flip upside down quickly, pastry side down.
Serve slightly warm, either on its own or with a dollop of crème fraîche.
 Jill Colonna has been living in Paris since 1992. She is the author of the bestselling Mad About Macarons, and her latest and wildly popular patisserie recipe book Teatime in Paris! For more recipes, food and travel adventures, visit Jill’s blog at MadAboutMacarons.com
Share to: Facebook Twitter LinkedIn Email
Related Articles
Leave a reply
Your email address will not be published. Required fields are marked *