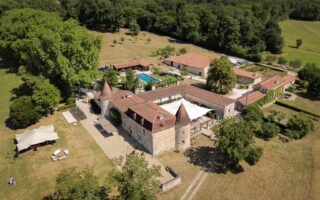
Buying and Renovating an Auction Property Part 2

The Renovation Work
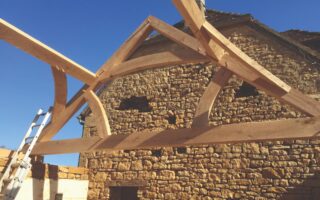
Work started on the 8th September and, although the initial clearing out and demolishing of the old roof took a little longer than expected, we were on target to finish the building project within 3 months. First the roof came off and the walls were capped ready for the new roof. We had a new “A frame” constructed as the original beams were not solid enough. This was an exact replica of the original roof timbers which was a condition stipulated by the planning department. Although we kept the original canal tiles we opted for canalit on the roof which is basically sheets of lightweight concrete and fibreglass attached to the roof rafters providing a watertight finish. The canal tiles are then laid on top to give the appearance of an old roof and the ridge tiles are laid. The advantage to this is that, even if there is a storm and some of the canal tiles are blown off the roof, there is absolutely no chance of water damage to the property.
We knocked out the old wattle and daub from between the original beams to leave the oak uprights exposed as the balcony timbers. The walls were prepared, new floor levels created in order to achieve full height in the attic room, floors laid, ceilings insulated, and walls plastered or hacked out and pointed. Internally we moved a large oak beam in order to allow space for the new position of the staircase. This meant removing a short oak beam in the kitchen and sourcing a longer old beam to replace it. As we were taking out internal walls on the ground floor to create an open plan feel to the property we were able to re-use the displaced short oak beam as an upright post.
Bâtiment de France was insisting on a rendered finish to the outside, which was not our first choice as we had wanted to keep the stone exposed. We eventually agreed on a compromise of keeping the stone around the openings and the beautiful carved stone above the front door exposed, but rendering the rest. New doors and windows were fitted. For speed we chose to buy the doors from Lapeyre as we have always found the quality of their mid-range products, which come with a 10-yr guarantee, to be good.
Solid chestnut flooring from a local supplier in the Dordogne was laid and I was summoned in at the weekend to treat the floorboards. We decided that we wanted to keep the lighter colour of the wood, so opted for a colourless matt vitrificateur which protects and hardens the wood, allowing it to be washed as required but maintaining the natural look of the wood. We learnt that, although they are easier to apply, oil-based products are soon to be outlawed so we decided on a water based solution. This did entail applying an extra coat and more sanding between coats but at least it will conform to the new regulations due to come in sometime in the future. During this stage we were still using ladders and scaffolding to get up to the first floor. We had contracted a local artisan based in Belvès to build us a solid chestnut staircase, but James was keen to get this fitted at the last minute to avoid any damage from builders traipsing through the building. Obviously I would have preferred to have had the staircase in earlier, but I was over-ruled on this one!
Once the team left the site, the carpenter finally moved in and fitted the handmade staircase. We opted for chestnut as it is stronger than pine but more reasonable than oak. It also meant that the staircase could be treated with the same finish as the floorboards which would continue the luminous feel of the house. Knowing that the decorating would take a little longer, as I was now heavily into the second trimester of my first pregnancy, we enlisted help from friends and family, calling in any favours that we could! We wire brushed the old beams and painted on linseed oil which both protects the wood and removes any traces of plaster. It is such a quick and simple treatment with instant results so is very satisfying work. When we came to the original terracotta floor tiles in the lounge we discovered that, unfortunately, a previous owner had apparently mixed concrete on some of them! After initially hiring a machine to try to sand it off, we eventually gave up and decided that we would have to relay 60 tiles. Although this was not something we were keen to do I think the sight of me on my hands and knees sanding tiles was too much of a guilt trip for James! However, it proved not to be too much of a problem as the area was fairly small and this small quantity of tiles was relatively easy to source. Once the tiles had been laid and the floor thoroughly cleaned, we applied several coats of linseed oil to protect the tiles. After this oil had soaked in we were able to wash and polish the floor to achieve a natural warm shine. The walls were all painted in white emulsion as we felt this would create the best blank canvas for any prospective buyer and would ensure that the photos would show the features of the property off to their best.
Although the work has mainly been done by our own company, we have out-sourced a couple of areas where we felt that it was important to bring in skilled professionals. With the terracing we chose to employ “Ideal Perigord Polyester” who are based in the Dordogne to come and lay the waterproof membrane. This would obviously give us a guarantee that the waterproofing would be permanent and they were able to come and carry out the work when we needed it done. We are also able to use their facture against our capital gains when we come to sell the property. The only other work that was outsourced was the plumbing to our local plumber/electrician Serge Venancie. Although James installed the bathroom furniture and fittings, Serge was able to inspect James’ work, complete the joints, and also provide the all-important guarantee for all of the plumbing work.
The property is now totally finished is currently being rented. For any more information on any of the aspects covered in this article, please contact Vanessa using the details below.
You can read Part 1 of this article here.
© Vanessa Hopkins 2009
Tel: 05 53 36 34 59
www.hopkinsrenovations.com
Share to: Facebook Twitter LinkedIn Email
More in canals, decoration, dordogne, family, learning, renovation, work
Related Articles

Leave a reply
Your email address will not be published. Required fields are marked *